How to install and self host Supabase

This guide will demonstrate how to self-host Supabase. We will also teach you how to set up a reverse proxy using Nginx, and how to obtain an SSL certificate. To know about Supabase, refer to our previous article about Introduction of Supabase.
Installing Supabase with Docker
It is recommended that you self-host Supabase using Docker. The containerization of Docker also simplifies the process of setting up and managing a platform like Supabase.
In the following sections, we will show you how to use Docker and Docker Compose to set up your own Supabase instance. It includes instructions on how to install Docker and download the necessary Supabase files.
Then, read on to learn how to customize your security instance.
How to install Docker Engine on Ubuntu
Docker containers are deployed using Docker Engine, the underlying containerization software. Following are the instructions for installing Docker Engine on Ubuntu Make sure Docker is not already installed. If any of the packages aren't found, then you can safely ignore the output.
sudo apt remove docker docker-engine docker.ioTo configure Docker's repository, install the following packages:
sudo apt update sudo apt install apt-transport-https ca-certificates curl gnupg lsb-releaseInclude Docker's GPG key. You must replace [url] with the distribution's url in the following command.
curl -fsSL [url]/gpg | sudo gpg --dearmor -o /usr/share/keyrings/docker-archive-keyring.gpgOnce again, replace [url] with the url that corresponds to the distribution your system runs.
echo "deb [arch=amd64 signed-by=/usr/share/keyrings/docker-archive-keyring.gpg] [url] $(lsb_release -cs) stable" | sudo tee /etc/apt/sources.list.d/docker.list > /dev/null
Get Docker Engine and other necessary packages installed
sudo apt update

sudo apt install docker-ce docker-ce-cli containerd.io
How to install Docker Compose Plugin on Ubuntu
Docker Compose enables you to run container environments using YAML definitions.
Following are the instructions for installing Docker Compose Plugin on Ubuntu
i) This command downloads the 2.20.0 release and saves the executable to /usr/local/bin/docker-compose, enabling this software to be accessible worldwide:
sudo curl -L "https://github.com/docker/compose/releases/download/2.20.0/docker-compose-$(uname -s)-$(uname -m)" -o /usr/local/bin/docker-compose
ii) To make docker-compose executable, set the following permissions:
sudo chmod +x /usr/local/bin/docker-composeEnsure that the installation was successful by viewing the version information:
docker-compose --version
Downloading Supabase
Supabase runs its Docker Compose setup from its Git repository. To run your Supabase instance, you must download your own copy of the repository. The cloned repository stores your Supabase configuration files once you have it.
i) Take a clone of the Supabase repository from GitHub. The following command creates a supabase subdirectory in your current directory:
git clone --depth 1 https://github.com/supabase/supabaseSet up Supabase secrets
cd supabase/docker/
cp .env.example .env
Now we get inside the docker directory and copy the file for the environment variables.
Generate passwords
Keeping your Supabase instance secure is made easier with keys and secrets. Supabase's documentation recommends doing this as part of its basic setup steps. It would certainly be a good idea to set these before running the instance in a production environment.
i) You will be creating two passwords that should be at least 32 characters long and contain no special characters. These passwords will be referred to as JWT_ANON_PASSWORD and JWT_SERVICE_PASSWORD . The password generator on Bitwarden can help you create random passwords for the application. You can also use any random string generator to generate password.
ii) You can generate API keys through the Supabase API generator tool. By using this tool, you can create two specific JavaScript Web Tokens (JWTs) from JWT_SERVICE_PASSWORD. The JWT Secret should be filled in with JWT_SERVICE_PASSWORD , and ANON_KEY should be selected as the Preconfigured Payload. Next, click the Generate JWT button and save as JWT_ANON_KEY
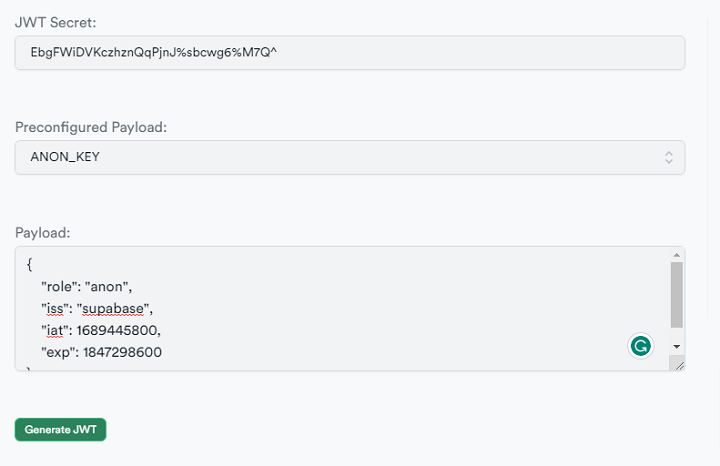
Using a random example password like from above, the result could look like:
eyJhbGciOiJIUzI1NiIsInR5cCI6IkpXVCJ9.ewogICAgInJvbGUiOiAiYW5vbiIsCiAgICAiaXNzIjogInN1cGFiYXNlIiwKICAgICJpYXQiOiAxNjg5NDQ1ODAwLAogICAgImV4cCI6IDE4NDcyOTg2MDAKfQ.euNg7qEg4brM5wC1fdBhHRhL6GClLiTzSMggT8Ql-CsEnter JWT_SERVICE_PASSWORD into the JWT Secret field, but this time select SERVICE_KEY as the Preconfigured Payload. To generate JWT_SERVICE_KEY, click the Generate JWT button and save it with your passwords.
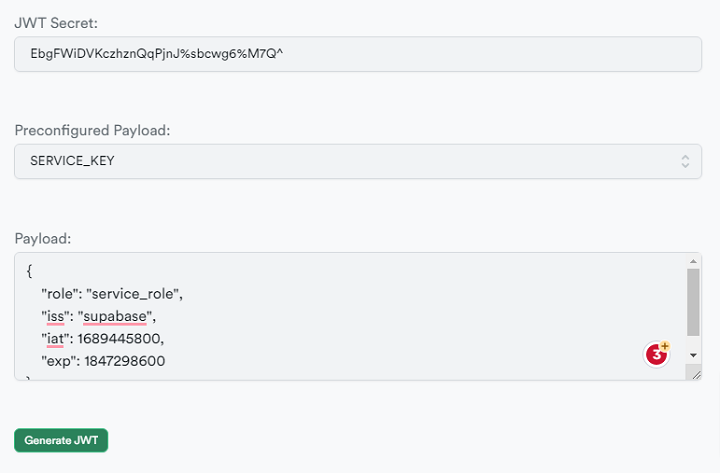
If we use the same random example password, the result may look like this:
eyJhbGciOiJIUzI1NiIsInR5cCI6IkpXVCJ9.ewogICAgInJvbGUiOiAic2VydmljZV9yb2xlIiwKICAgICJpc3MiOiAic3VwYWJhc2UiLAogICAgImlhdCI6IDE2ODk0NDU4MDAsCiAgICAiZXhwIjogMTg0NzI5ODYwMAp9.qSL5elMAhfTpNyk0uVqY5rbA6DvQHMcDdSPx2Q3jGbw
In your supabase/docker directory, open the .env file. Put your JWT_ANON_PASSWORD in place of POSTGRES_PASSWORD, JWT_SECRET, ANON_KEY, and SERVICE_ROLE_KEY with JWT_SERVICE_PASSWORD, JWT_ANON_KEY and JWT_SERVICE_KEY respectively:
POSTGRES_PASSWORD = JWT_ANON_PASSWORD
JWT_SECRET = JWT_SERVICE_PASSWORD
ANON_KEY = JWT_ANON_KEY
SERVICE_ROLE_KEY = JWT_SERVICE_KEY
Kong's configuration file is located at volumes/api/kong.yml in the supabase/docker directory. Change the keys under the anon and service_role usernames in the consumers section of the file.
consumers:
- username: anon
keyauth_credentials:
- key: JWT_ANON_KEY
- username: service_role
  keyauth_credentials:
  - key: JWT_SERVICE_KEY
In order for these changes to be effective, you must restart your Supabase instance:
sudo docker compose down
sudo docker compose up -d
Activate Docker
Now we create a new screen and name it to make it easier to access in the future
screenIn this screen, you will see an introduction to the program, hit enter. After that, we can disconnect from the screen by pressing ctrl + a and then ctrl + d. The console will display the number of the screen.
screen -S {screen_number} -X sessionname supabase
screen -r supabase
The screen has been reconnected to the screen supabase. When we disconnect from it, we use ctrl + a and then ctrl + d.
cd supabase/docker/
docker compose up
Once the docker is running, it will download several things, and you will be able to connect to your domain on port 3000.
Reverse proxy
NGINX is an excellent proxy server. The Supabase routing service allows you to control which Supabase endpoints are exposed.
For reverse proxy, we first install Nginx.
sudo apt install nginx sudo systemctl status nginxConnecting to our domain will bring up the Nginx welcome page.
Once you have created your custom domain, copy the contents below and paste it in your application. You can replace 192.0.2.0 with your server's IP address in this example and example.com with your website domain name.
map $http_upgrade $connection_upgrade {
    default upgrade;
    '' close;
}

upstream supabase {
    server localhost:3000;
}

upstream kong {
    server localhost:8000;
}

server {
    listen 80;
    server_name localhost 192.0.2.0 example.com;

    # REST
    location ~ ^/rest/v1/(.*)$ {
        proxy_set_header Host $host;
        proxy_pass http://kong;
        proxy_redirect off;
    }

    # AUTH
    location ~ ^/auth/v1/(.*)$ {
        proxy_set_header Host $host;
        proxy_pass http://kong;
        proxy_redirect off;
    }

    # REALTIME
    location ~ ^/realtime/v1/(.*)$ {
        proxy_redirect off;
        proxy_pass http://kong;
        proxy_http_version 1.1;
        proxy_set_header Upgrade $http_upgrade;
        proxy_set_header Connection $connection_upgrade;
        proxy_set_header Host $host;
    }

    # STUDIO
    location / {
        proxy_set_header Host $host;
        proxy_pass http://supabase;
        proxy_redirect off;
        proxy_set_header Upgrade $http_upgrade;
    }
}
Then, we can press ctrl + o and ctrl + x to write and exit. The default config can then be linked to sites-enabled and Nginx can be restarted after the symbolic link has been created.
sudo ln -s /etc/nginx/sites-available/{your_domain_name} /etc/nginx/sites-enabled/{your_domain_name}
sudo unlink /etc/nginx/sites-enabled/default
sudo systemctl restart nginx
Supabase can now be accessed by the domain name.
Secure your site with SSL
We will create an SSL certificate for our Supabase using Certbot.
The first step is to install core, then the next step is to install certbot. In the next step, we configure it, and at the end, we test how auto-renewal works, and then restart Nginx.
sudo snap install core; sudo snap refresh core
sudo snap install --classic certbot
sudo ln -s /snap/bin/certbot /usr/bin/certbot
sudo certbot --nginx
sudo certbot renew --dry-run
sudo systemctl restart nginx
Supabase Security
In order to secure the Supabase dashboard, we do this to generate a password for it. If you want to generate a secure password, you should use a secure password generator and paste it twice into the box.
sudo htpasswd -c /etc/apache2/.htpasswd {Admin_Username}
After that, we can verify the password
cat /etc/apache2/.htpasswdAfter that, we edit Nginx's configuration to protect it with a password
sudo nano /etc/nginx/sites-available/{Domain Name}
Ensure that the studio is set up this way
# STUDIO
location / {
  proxy_set_header Host $host;
  proxy_pass http://supabase;
  proxy_redirect off;
  proxy_set_header Upgrade $http_upgrade;
  auth_basic "Administrators Area";
  auth_basic_user_file /etc/apache2/.htpasswd;
}
After that restart it
In this section, you can fill out the username and the password again as the one you filled out earlier.
Setup Supabase again
Next, we'll set up the domain for the API and the backend for Supabase.
screen -r supabaseWe then end the Supabase docker instance by pressing ctrl + c. Next, we edit the .env file.
Below are the details we need to change
...
API_EXTERNAL_URL=https://{your_domain}
...
SUPABASE_PUBLIC_URL=https://{your_domain} # replace if you intend to use Studio outside of localhost
Once the changes have been saved, we can restart Supabase by pressing the keys ctrl + o and ctrl + x.
docker compose upIn order to disconnect, you need to do ctrl + a then ctrl + d on the keyboard.
Conclusion
This completes the setup for the self-hosting Supabase backend, which is protected by a password and enclosed in a certified domain