Next.js Route Handlers: Crafting Integrated API Endpoints


Next.js is one of the popular React frameworks, which streamlines the development process enabling developers to create a full-stack web application. One of its standout features is a highly flexible routing mechanism, allowing developers to seamlessly create and define API routes. An API route is essentially a URL that directs client requests to the specific server resource equipped to handle and process those requests.
Route Handlers are basically functions which are used to handle HTTP requests for a route and to send an appropriate response
Express.js or Next.js
This choice depend upon the type of application you are building,
Express.js is preferred If we are building a server sided application its light-weight, flexible and fast, However if we are building a static site and SEO is our priority Next.js is preferred.
Migrating to Next13
In Next 13 we define route handlers in the route.js (route.ts in case of typescript) file in the app directory for any route segment unlike in Next 12 (page router) where you need to specify endpoints in a folder named api.
Only catch is that we cannot define route.js and page.js at the same route segment level otherwise next.js gets confused whether we are trying to get the UI or access the endpoint.
Although it is not mandatory, we can follow the convention of defining route handlers in a folder named api.
Route handlers allow custom request handler creation using the web Request and Response API. Next.js extends these native Request and Response with NextResponse and NextRequest to provide convenient helpers.
Setting up our application
Start by creating a new next application
npx create-next-app@latest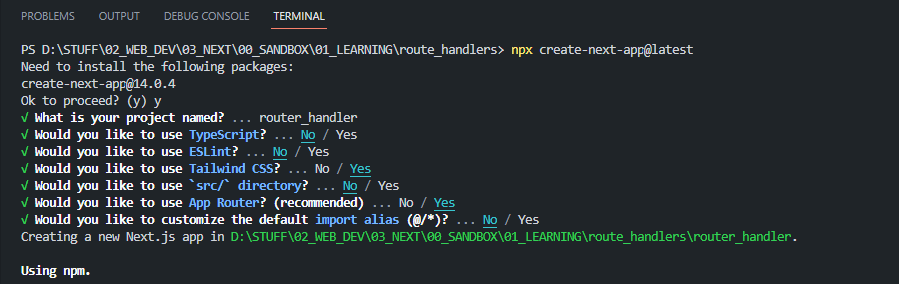
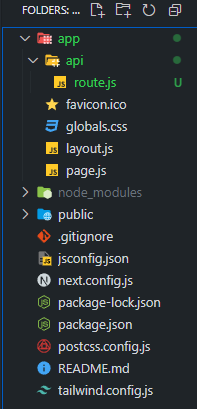
After installation process create an api folder in the app directory, now all the route handler can be defined in a route.js file in this directory
From the Route.js files we export the function with name corresponding to the HTTP methods (GET, POST etc)
Supported HTTP methods are
GET, POST, PUT, PATCH, DELETE, HEAD & OPTION
If an unsupported method is called, Next.js returns a 405 method not allowed response.
File: /app/api/route.js
export async function GET( request ) {
        //code
}

export async function POST( request ) {
        //code
}

export async function PUT( request ) {
        //code
}

export async function HEAD( request ){
        //code
}

export async function DELETE( request ) {
        //code
}
The parameter of these function consist of request and context
request object - This object is a NextRequest object, which is an extension web Request API, using which we get more control over the request including easily accessing cookies
context object- This object has only one value which is the params object (similar to params object in page.js and layout.js file) it contain all the dynamic route parameter for the given route
File: api/product/[productId]/route.js
export async function GET( request, context ) {

        const {id} = context.params;

       //Fetch from DB and return the response
}
Route Handlers can extend the Web Response API by returning a NextResponse object. This allows you to easily set cookies, headers, redirect, and rewrite
Static & Dynamic Route handler
Just the page.js file route handlers have also the option to be either statically executed or dynamically executed
Static route handler
By default all GET requests without a request object are statically executed, this means the file is executed once at the build time.
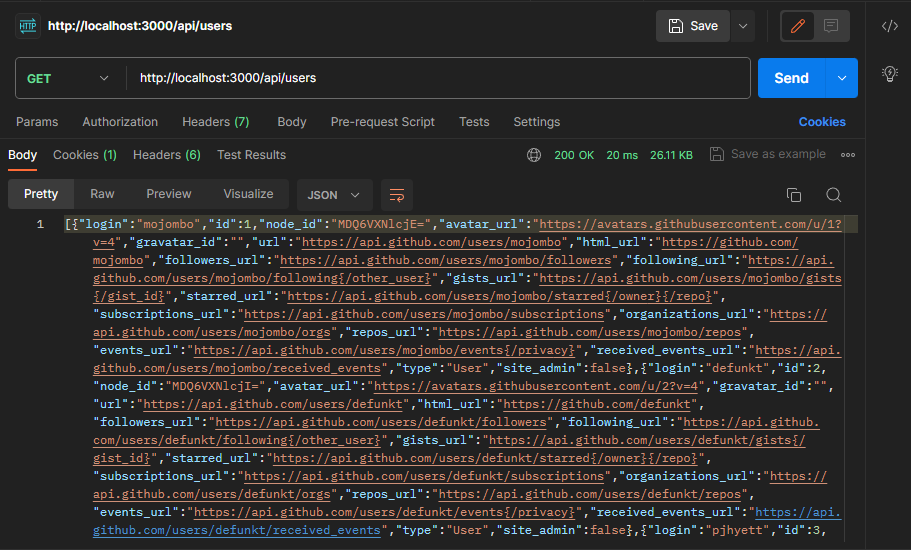
File: app/api/users/route.js
import { NextResponse } from "next/server";

export async function GET() {

  const res = await fetch("https://api.github.com/users");

  const data = await res.json();

  return NextResponse.json(data);

}
Now we can test the API using postman
We can also revalidate the static fetches by passing the revalidate option in the fetch api or by manually exporting segment configuration option at the top of the file.
export const revalidate= 60
Dynamic route handler
Route handlers can be dynamically executed in cases of GET requests with request object, any other HTTP method, using cookies and headers or manually specifying the segment to dynamic mode.
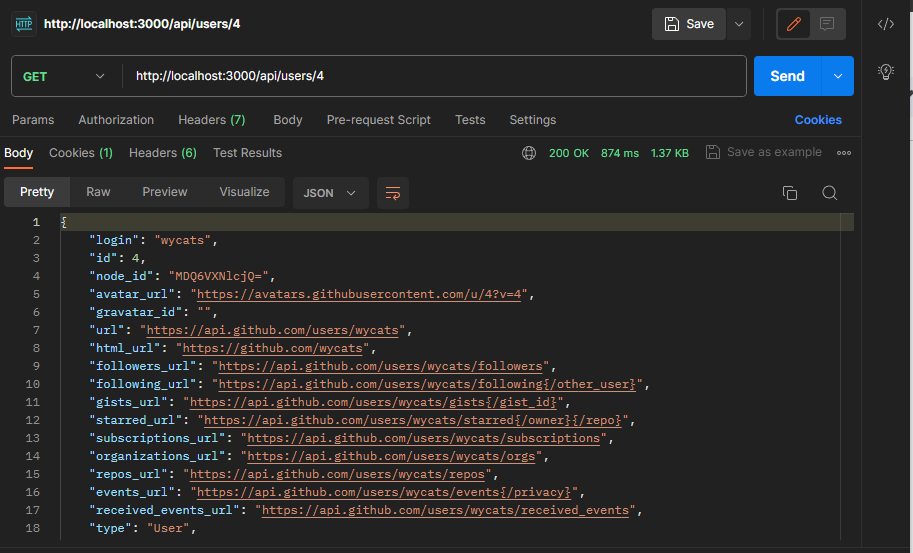
File: app/api/users/[userId]/route.js
import { NextResponse } from "next/server";

export async function GET(request, context) {

  const { userId } = context.params;

  const res = await fetch("https://api.github.com/user/" + userId);

  const data = await res.json();

  return NextResponse.json(data);

}
Note- These Route handlers have the same route segments configuration as page.js and layout.js
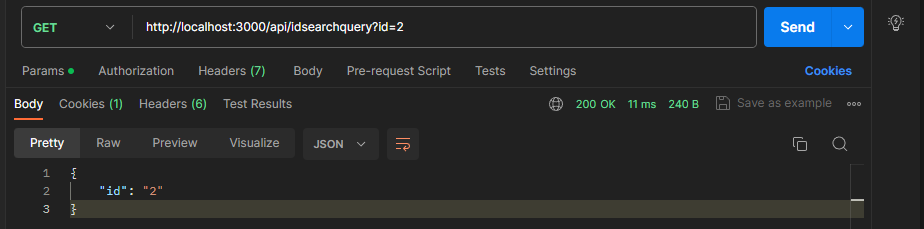
Search Query
Passing search parameter is a bit different, we create instance of URL and pass the url which returns us searchParams, using which we can extract the query strings
File: /app/api/idsearchquery/route.js
import { NextResponse } from "next/server";

export async function GET(request) {

  const { searchParams } = request.nextUrl;

  const id = searchParams.get("id");

  return NextResponse.json({ id });

}
Redirect
We can redirect when a request is made, first import redirect function from next/navigation
File: /app/api/redirect/route.js
import { redirect } from "next/navigation";

export async function GET() {

  redirect("https://www.google.com");

}
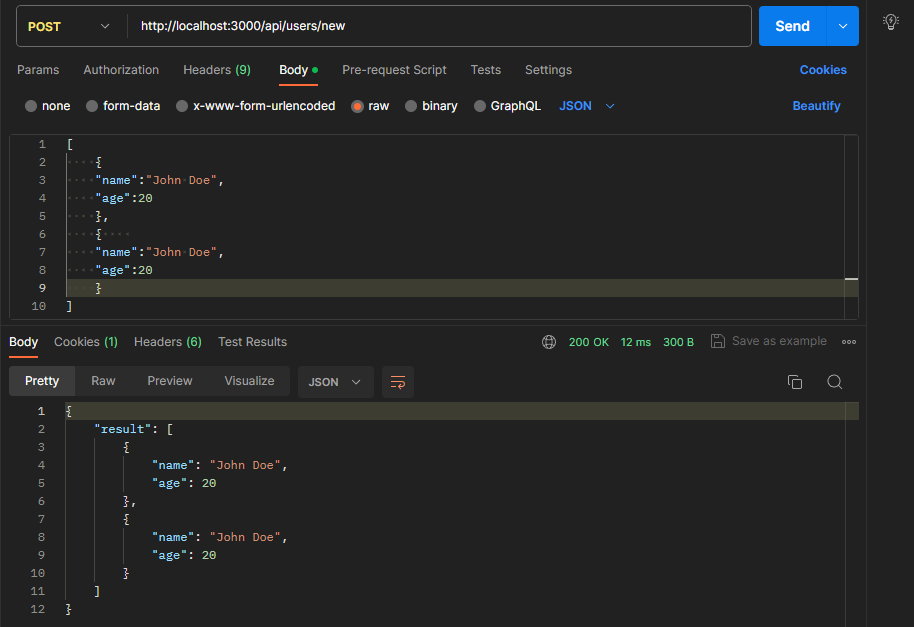
Request body
By utilising the request.json() method, the function asynchronously parses and retrieves the JSON data from the request
File: /app/api/users/new/route.js
import { NextResponse } from "next/server";

export async function POST(request) {

  const data = await request.json();

  return NextResponse.json({ result: data });

}
Form Submission
By utilising the request.formData() method, the function asynchronously parses and retrieves the form data from the request.
File: /app/api/form/route.js
import { NextResponse } from "next/server";

export async function POST(request) {

  const formData = await request.formData();

  const name = formData.get("name");

  const email = formData.get("email");

  return NextResponse.json({ name, email });

}
File: /app/page.js
export default function Home() {

  return (

    <main>

      <form action="/api/form" method="post">

        <label htmlFor="name">Name:</label>

        <input type="text" id="name" name="name" />

        <label htmlFor="email">Email:</label>

        <input type="email" id="email" name="email" />

        <button type="submit">Submit</button>

      </form>

    </main>

  );

}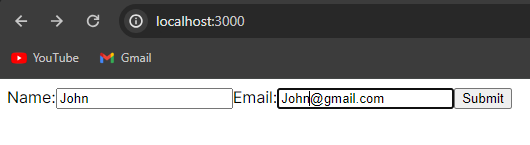
On submitting the form we get the form data as response in json format

Conclusion
In summary, choosing between Express and Next.js depends on what you're building. If you want a flexible framework to create APIs or web servers with lots of customization options, go for Express. On the flip side, if you're into React and need features like server-side rendering or making static sites, Next.js is your go-to for a smoother development ride.
One important thing to understand is Express and Next.js can work together! They can complement each other in certain scenarios. For example, you can use Express as a middleware layer for handling API requests in a Next.js application.