Real-Time Communication with Node.js, Express, and WebSockets

In modern web development, real-time communication between clients and servers has become essential for building interactive and dynamic applications. One of the most efficient ways to achieve real-time communication is by using WebSockets. In this article, we'll explore how to implement WebSockets with Node.js and Express to create a real-time chat application. We'll cover the fundamental concepts and provide clear explanations of the code, enabling you to understand the process transparently.
Introducing WebSocket: Enabling Full-Duplex Communication
WebSocket is a communication protocol that enables full-duplex, bidirectional communication between a client and a server over a single TCP connection. It was standardized by the IETF in 2011, and its adoption has been instrumental in the development of real-time web applications.
Traditionally, HTTP follows a request-response model, where a client sends a request to the server, and the server responds with the requested data. However, this approach has limitations when it comes to real-time communication. WebSocket overcomes this limitation by providing persistent connections, allowing both the client and server to initiate communication at any time without the need for repeated handshakes.
The Advantages of Using WebSocket with Node.js
Low Latency: WebSocket reduces latency significantly, as it establishes a continuous connection between the client and the server. The result is instant data transmission and real-time updates.
Bi-Directional Communication: Unlike HTTP, which only supports uni-directional communication, WebSocket enables both the client and server to send data to each other independently. This enables interactive and real-time applications where data needs to flow in both directions.
Scalability: Node.js's event-driven architecture and non-blocking I/O make it highly scalable, allowing it to handle a large number of concurrent WebSocket connections with ease.
Real-Time Updates: Applications such as chat, collaborative tools, and live sports updates benefit from real-time data delivery, which WebSocket facilitates.
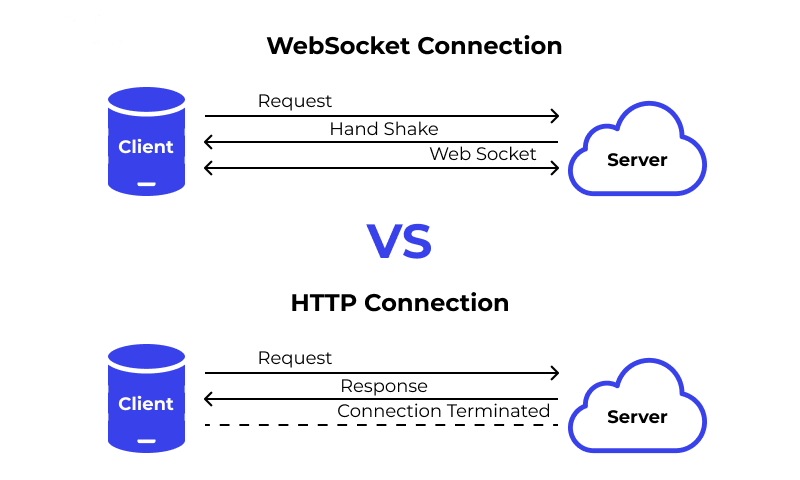
For a clear understanding of the difference between an http connection and a web socket connection go through this image:
Implementing WebSocket with Node.js
In this article we are going to implement web socket to create a real time chat application. Follow the code along to build your first chat app using websockets and nodejs.
Prerequisites
To follow along with this tutorial, you should have a basic understanding of JavaScript, Node.js, and Express.
Setting Up the Project
Let's start by setting up a new Node.js project and installing the necessary dependencies.
Step 1: Create a new project folder and navigate into it.
Step 2: Initialize a new Node.js project using npm:
npm init -yStep 3: Install Express and ws (WebSocket) packages:
npm install express wsServer-Side Implementation
Now, let's create the server-side code to handle WebSocket connections.
Create a new file called server.js and add the following code:
const express = require('express');
const WebSocket = require('ws');

const app = express();

// Initialize WebSocket server
const wss = new WebSocket.Server({ port: 8080 });

// WebSocket event handling
wss.on('connection', (ws) => {
  console.log('A new client connected.');

  // Event listener for incoming messages
  ws.on('message', (message) => {
    console.log('Received message:', message.toString());

    // Broadcast the message to all connected clients
    wss.clients.forEach((client) => {
      if (client.readyState === WebSocket.OPEN) {
        client.send(message.toString());
      }
    });
  });

  // Event listener for client disconnection
  ws.on('close', () => {
    console.log('A client disconnected.');
  });
});

// Start the server
const port = 3000;
app.listen(port, () => {
  console.log(`Server started on http://localhost:${port}`);
});
Explanation
1. We require the necessary modules: express to create our HTTP server and ws for WebSocket functionality.
2. We create an Express app.
3. We initialize a WebSocket server using ws and attach it to the same HTTP server that Express is running on. We use port 8080 for WebSocket communication.
4. The WebSocket server listens for incoming connections. When a client connects, it logs a message to the console.
5. We set up event listeners for the WebSocket instance: message for incoming messages and close for disconnections.
6. When a message is received from a client, the server logs the message and broadcasts it to all connected clients.
7. When a client disconnects, the server logs a message to the console.
Client-Side Implementation
Now, let's create the client-side code to connect to our WebSocket server and handle communication.
<!DOCTYPE html>
<html>
<head>
  <title>Real-Time Chat</title>
</head>
<body>
  <h1>Real-Time Chat</h1>
  <div id="messages"></div>
  <input type="text" id="messageInput" />
  <button onclick="sendMessage()">Send</button>

  <script>
    const socket = new WebSocket('ws://localhost:8080');

    // Event listener for WebSocket connection open
    socket.addEventListener('open', () => {
      console.log('Connected to WebSocket server.');
    });

    // Event listener for incoming messages
    socket.addEventListener('message', (event) => {
      const messagesDiv = document.getElementById('messages');
      messagesDiv.innerHTML += `<p>${event.data.toString()}</p>`;
    });

    // Function to send messages
    function sendMessage() {
      const messageInput = document.getElementById('messageInput');
      const message = messageInput.value;
      socket.send(message);
      messageInput.value = '';
    }
  </script>
</body>
</html>
Explanation
1. We create a basic HTML page with a heading, a div to display messages, an input field to type messages, and a "Send" button to send messages.
2. We establish a WebSocket connection to our server at ws://localhost:8080.
3. We add event listeners for open to log when the connection is established and message to display incoming messages in the messages div.
4. When the "Send" button is clicked, the sendMessage() function retrieves the message from the input field, sends it to the server using the WebSocket connection, and clears the input field.
Running the Application
Start the server by running the following command in your terminal:
node server.jsOpen index.html in your web browser by simply double-clicking on the file.
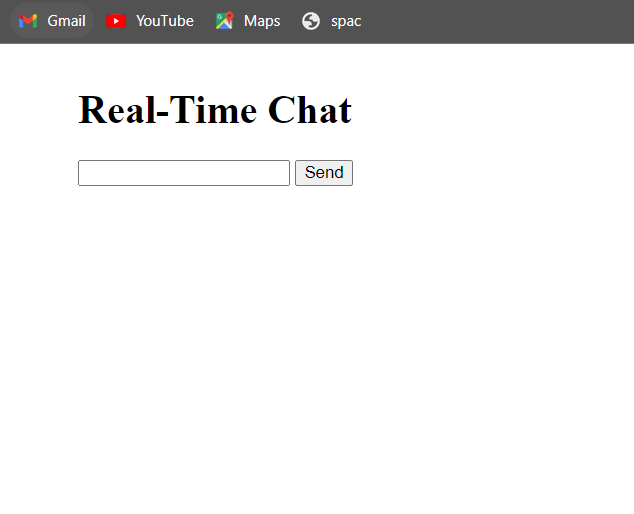
The basic html page should look like this, before we send any chat:
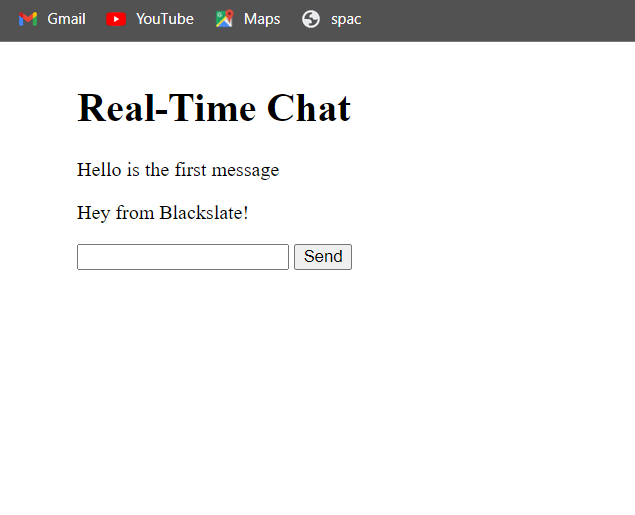
After sending some demo chat the html page should look like this:
Conclusion
Congratulations! You have successfully implemented a real-time chat application using Node.js, Express, and WebSockets. This article covered the essential code snippets required to create a WebSocket server and a client that communicates in real time. In this article we covered about what websocket is , how it solves the http limitation, the advantages of websockets in real time chatting application, we build our first chat app also. With this foundation you can even build bigger application after respective transitions.