Spring Boot and Amazon DynamoDB Integration


In this article, we will look at the basics of integrating DynamoDB with a Spring Boot application.
What is Amazon DynamoDB?
DynamoDB provides excellent speed and flexibility with minimal setup and maintenance. In any size, it is a key-value and document database with response times in the single digit milliseconds. Security, backup, and restoration are all included in this fully managed, long-lasting database.
The DynamoDB database is typically considered a NoSQL database, since it does not use SQL queries like relational databases. It stores JSON objects using a basic key-value format.
What is the importance of Amazon DynamoDB?
With DynamoDB, you can scale your application based on its load with automatic scalability, pay-per-use pricing, and ease of use. This makes it a popular choice for AWS Serverless applications. Due to its low maintenance requirements and strong integration with AWS's serverless solution and AWS Lambda, DynamoDB is also popular with firms that use serverless apps.
Due to the fact that AWS DynamoDB is a key-value store, it is particularly useful when you need to incorporate all the data needed for one operation in a single database. In the case of an application dashboard that shows a person's reading history, storing the articles in the user entity will perform better and cost less per query.
By placing users in one database and articles in another, when updating the page, one user and ten separate book entries must be retrieved. In comparison to a traditional data store, DynamoDB may be less suitable—additional queries cost more and slow down your application.
Maven Dependencies
You'll need to add the following dependencies to Spring to work with DynamoDB
<?xml version="1.0" encoding="UTF-8"?>
<project xmlns="http://maven.apache.org/POM/4.0.0" xmlns:xsi="http://www.w3.org/2001/XMLSchema-instance"
        xsi:schemaLocation="http://maven.apache.org/POM/4.0.0 http://maven.apache.org/xsd/maven-4.0.0.xsd">
        <modelVersion>4.0.0</modelVersion>
        <parent>
                <groupId>org.springframework.boot</groupId>
                <artifactId>spring-boot-starter-parent</artifactId>
                <version>2.7.3</version>
                <relativePath/> <!-- lookup parent from repository -->
        </parent>
        <groupId>com.example</groupId>
        <artifactId>DynamoDb-Spring-Boot-Application</artifactId>
        <version>0.0.1-SNAPSHOT</version>
        <name>DynamoDb-Spring-Boot-Application</name>
        <description>DynamoDb-Spring-Boot-Application</description>
        <properties>
                <java.version>17</java.version>
        </properties>
        <dependencies>
                <dependency>
                        <groupId>org.springframework.boot</groupId>
                        <artifactId>spring-boot-starter-web</artifactId>
                </dependency>
                <dependency>
                        <groupId>org.springframework.boot</groupId>
                        <artifactId>spring-boot-devtools</artifactId>
                        <scope>runtime</scope>
                        <optional>true</optional>
                </dependency>
                <dependency>
                        <groupId>org.springframework.boot</groupId>
                        <artifactId>spring-boot-starter-test</artifactId>
                        <scope>test</scope>
                </dependency>
                <dependency>
            <groupId>com.amazonaws</groupId>
            <artifactId>aws-java-sdk-dynamodb</artifactId>
            <version>1.12.520</version>
       </dependency>
       <dependency>
                   <groupId>com.github.derjust</groupId>
           <artifactId>spring-data-dynamodb</artifactId>
           <version>5.1.0</version>
       </dependency>
                <dependency>
                        <groupId>org.projectlombok</groupId>
                        <artifactId>lombok</artifactId>
                        <optional>true</optional>
                </dependency>
        </dependencies>
        <build>
                <plugins>
                        <plugin>
                                <groupId>org.springframework.boot</groupId>
                                <artifactId>spring-boot-maven-plugin</artifactId>
                                <configuration>
                                        <excludes>
                                                <exclude>
                                                        <groupId>org.projectlombok</groupId>
                                                        <artifactId>lombok</artifactId>
                                                </exclude>
                                        </excludes>
                                </configuration>
                        </plugin>
                </plugins>
        </build>
</project>
Configure the Client and DB Mapper
The next step is to create an instance of DynamoDB configuration class
package com.application.dynamodb.config;

import com.amazonaws.auth.AWSStaticCredentialsProvider;
import com.amazonaws.auth.BasicAWSCredentials;
import com.amazonaws.client.builder.AwsClientBuilder;
import com.amazonaws.services.dynamodbv2.AmazonDynamoDB;
import com.amazonaws.services.dynamodbv2.AmazonDynamoDBClientBuilder;
import com.amazonaws.services.dynamodbv2.datamodeling.DynamoDBMapper;
import org.springframework.context.annotation.Bean;
import org.springframework.context.annotation.Configuration;

@Configuration
public class DynamoDbConfiguration {

   @Bean
   public DynamoDBMapper dynamoDBMapper() {
       return new DynamoDBMapper(buildAmazonDynamoDB());
   }

   private AmazonDynamoDB buildAmazonDynamoDB() {
       return AmazonDynamoDBClientBuilder
               .standard()
               .withEndpointConfiguration(
                       new AwsClientBuilder.EndpointConfiguration(
                               "dynamodb.your-region.amazonaws.com",
                               "your-region"
                       )
               )
               .withCredentials(
                       new AWSStaticCredentialsProvider(
                               new BasicAWSCredentials(
                                       "your-access-Key",
                                       "your-secret-key"
                               )
                       )
               )
               .build();
    }
}
The above code defines a configuration class for DynamoDB in a Spring Boot application. It includes a method dynamoDBMapper() annotated with @Bean, which creates and returns a DynamoDBMapper instance. The DynamoDBMapper is configured with an instance of AmazonDynamoDB obtained from the buildAmazonDynamoDB() method.
The buildAmazonDynamoDB() method sets up and returns an instance of AmazonDynamoDB using the AmazonDynamoDBClientBuilder. It configures the client with an endpoint for a DynamoDB service in a specific AWS region, and provides AWS credentials (access key and secret key) for authentication.
Creating Model
Let's create a model class called Student and Department. For defining table names, attributes, keys, and other characteristics, this POJO uses AWS-DynamoDB-specific annotations (similar to Hibernate).
Student Entity
package com.application.dynamodb.entity;

import com.amazonaws.services.dynamodbv2.datamodeling.DynamoDBAttribute;
import com.amazonaws.services.dynamodbv2.datamodeling.DynamoDBAutoGeneratedKey;
import com.amazonaws.services.dynamodbv2.datamodeling.DynamoDBHashKey;
import com.amazonaws.services.dynamodbv2.datamodeling.DynamoDBTable;
import lombok.AllArgsConstructor;
import lombok.NoArgsConstructor;
import lombok.Data;

import java.util.Date;

@Data
@AllArgsConstructor
@NoArgsConstructor
@DynamoDBTable(tableName = "student")
public class Student{

   @DynamoDBHashKey
   @DynamoDBAutoGeneratedKey
   private String studentId;

   @DynamoDBAttribute
   private String firstName;

   @DynamoDBAttribute
   private String lastName;

   @DynamoDBAttribute
   private String email;

   @DynamoDBAttribute
   private Department department;
}
Department Entity
package com.application.dynamodb.entity;

import com.amazonaws.services.dynamodbv2.datamodeling.DynamoDBAttribute;
import com.amazonaws.services.dynamodbv2.datamodeling.DynamoDBDocument;
import lombok.AllArgsConstructor;
import lombok.Data;
import lombok.NoArgsConstructor;

@Data
@AllArgsConstructor
@NoArgsConstructor
@DynamoDBDocument
public class Department {

   @DynamoDBAttribute
   private String departmentName;

   @DynamoDBAttribute
   private String departmentCode;
}
Creating Repository
The next step is to create a StudentRepository interface for defining our CRUD functionality. Using this interface, data will be read and stored in DynamoDB.
package com.application.dynamodb.repository;

import com.amazonaws.services.dynamodbv2.datamodeling.DynamoDBMapper;
import com.amazonaws.services.dynamodbv2.datamodeling.DynamoDBSaveExpression;
import com.amazonaws.services.dynamodbv2.model.AttributeValue;
import com.amazonaws.services.dynamodbv2.model.ExpectedAttributeValue;
import com.application.dynamodb.entity.Student;
import org.springframework.beans.factory.annotation.Autowired;
import org.springframework.stereotype.Repository;

@Repository
public class StudentRepository {

   @Autowired
   private DynamoDBMapper dynamoDBMapper;


   public Student save(Student student) {
       dynamoDBMapper.save(student);
       return student;
   }

   public Student getStudentById(String studentId) {
       return dynamoDBMapper.load(Student.class, studentId);
   }

   public String delete(String studentId) {
           Student emp = dynamoDBMapper.load(Student.class, studentId);
       dynamoDBMapper.delete(emp);
       return "Student Deleted!";
   }

   public String update(String studentId, Student student) {
       dynamoDBMapper.save(student,
               new DynamoDBSaveExpression()
       .withExpectedEntry("studentId",
               new ExpectedAttributeValue(
                       new AttributeValue().withS(studentId)
               )));
       return studentId;
   }
}
Creating Controller
Lastly, we will test DynamoDB operations via REST endpoints created via controller classes.
package com.application.dynamodb.controller;
import org.springframework.web.bind.annotation.*;
import com.application.dynamodb.entity.Student;
import com.application.dynamodb.repository.StudentRepository;
import org.springframework.beans.factory.annotation.Autowired;
@RestController
public class StudentController {
@Autowired
private StudentRepository studentRepository;
@PostMapping("/student")
public Student saveStudent(@RequestBody Student student) {
return studentRepository.save(student);
}
@GetMapping("/student/{id}")
public Student getStudent(@PathVariable("id") String studentId) {
return studentRepository.getStudentById(studentId);
}
@DeleteMapping("/student/{id}")
public String deleteStudent(@PathVariable("id") String studentId) {
return studentRepository.delete(studentId);
}
@PutMapping("/student/{id}")
public String updateStudent(@PathVariable("id") String studentId, @RequestBody Student student) {
return studentRepository.update(studentId,student);
}
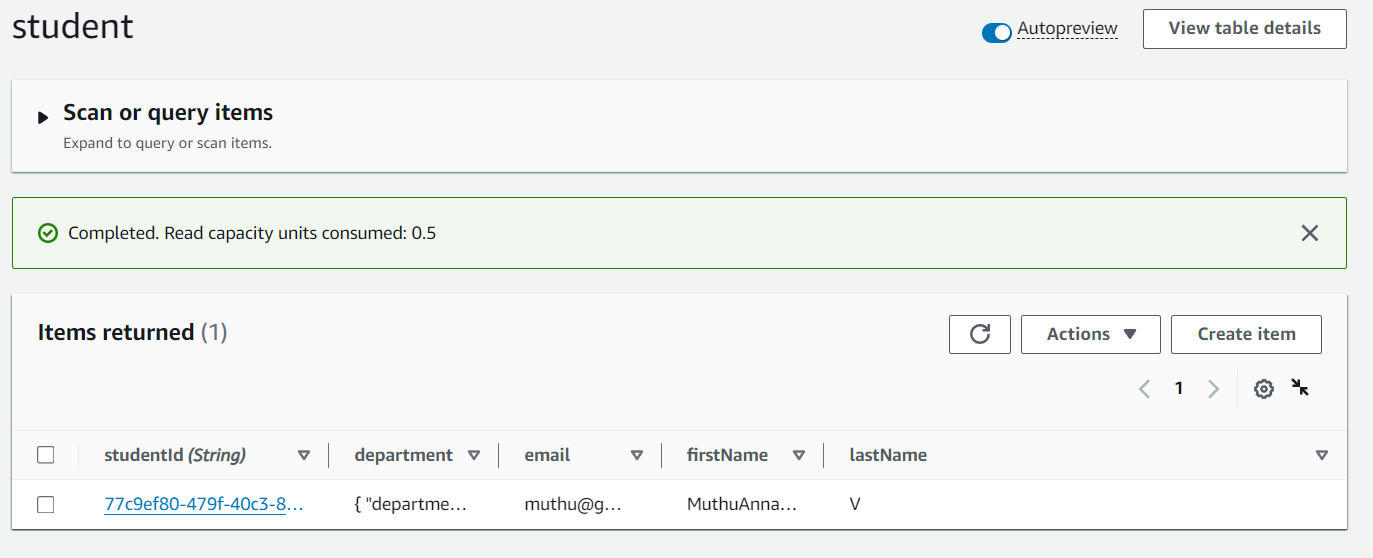
}Demo Screenshots
i) When we try to add the student
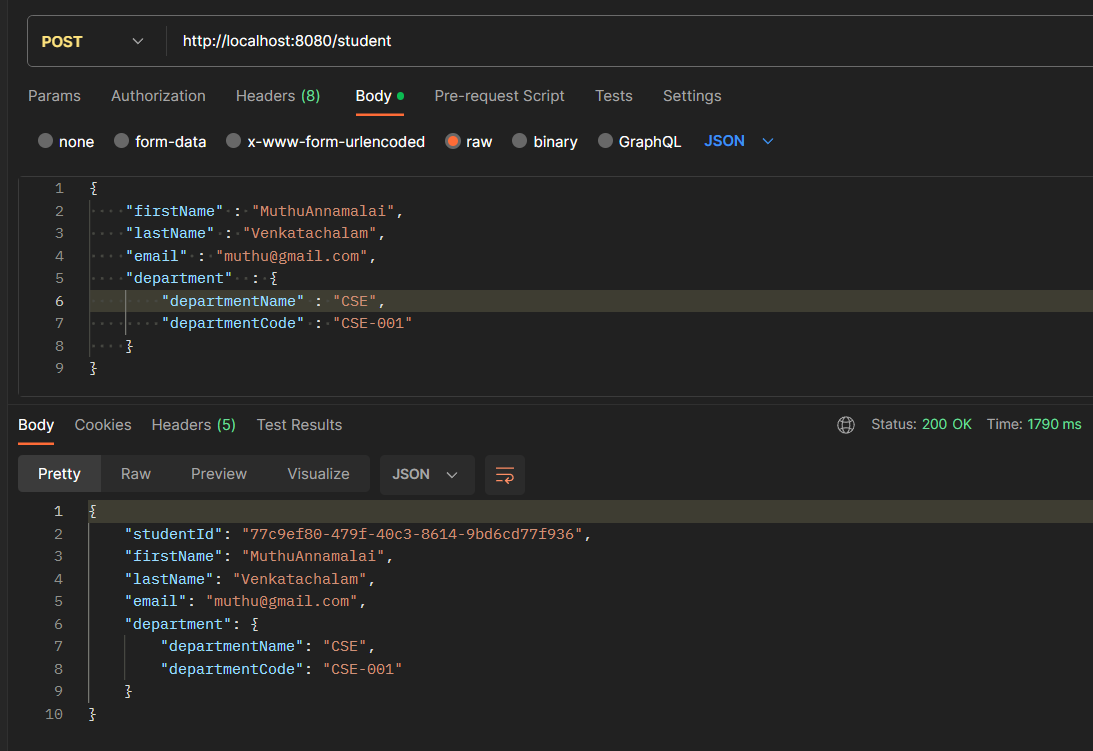
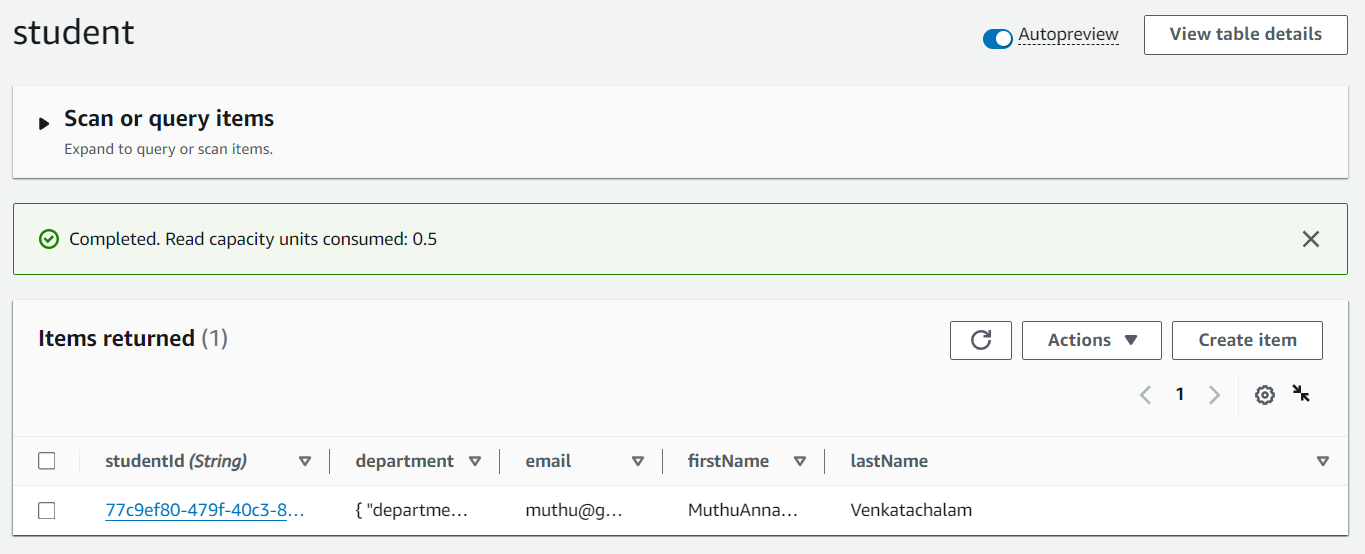
Following successful completion, the above payload is stored in DynamoDb as shown in the below image
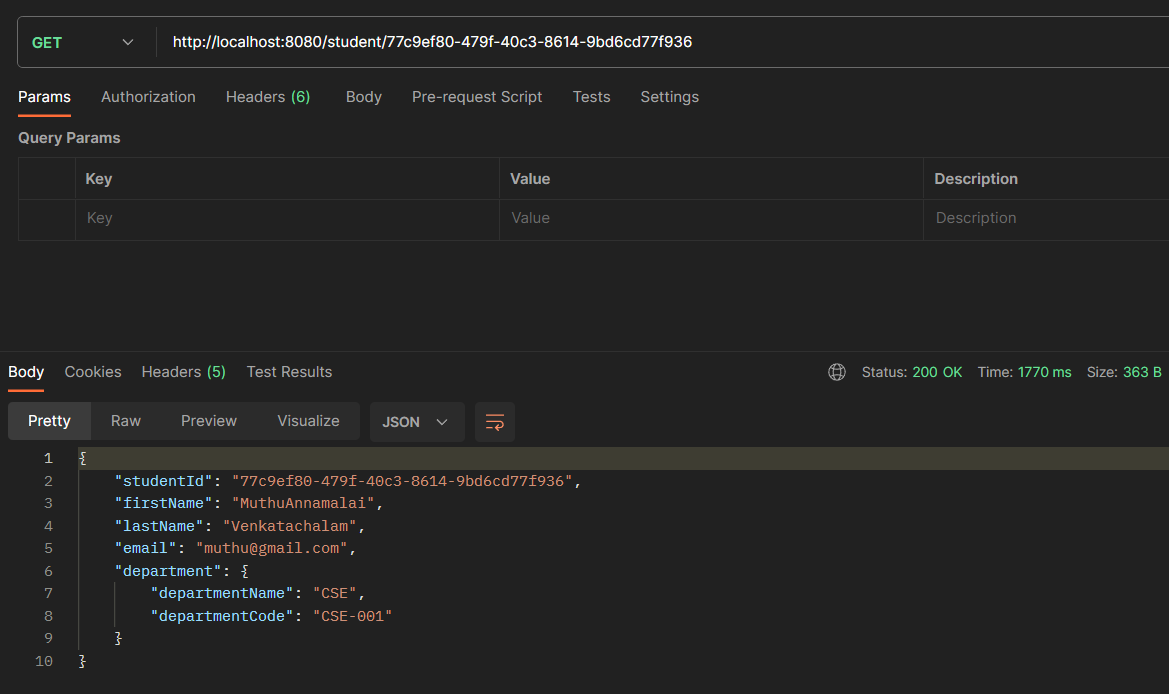
ii) When we try to get the student
iii) When we try to update the student
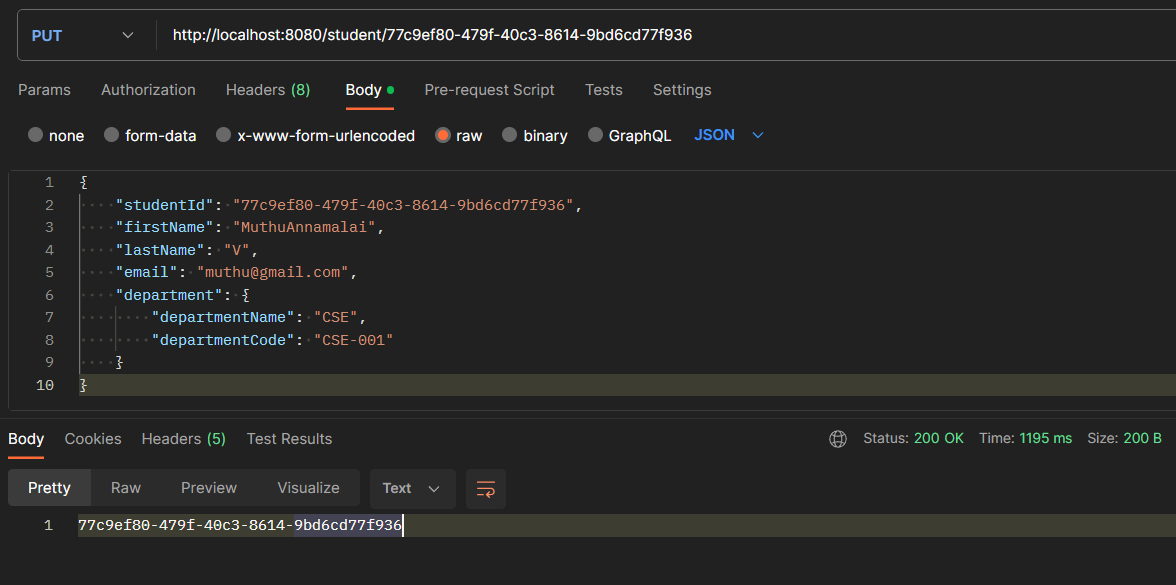
The data would be updated in DynamoDb upon successful completion, as shown below
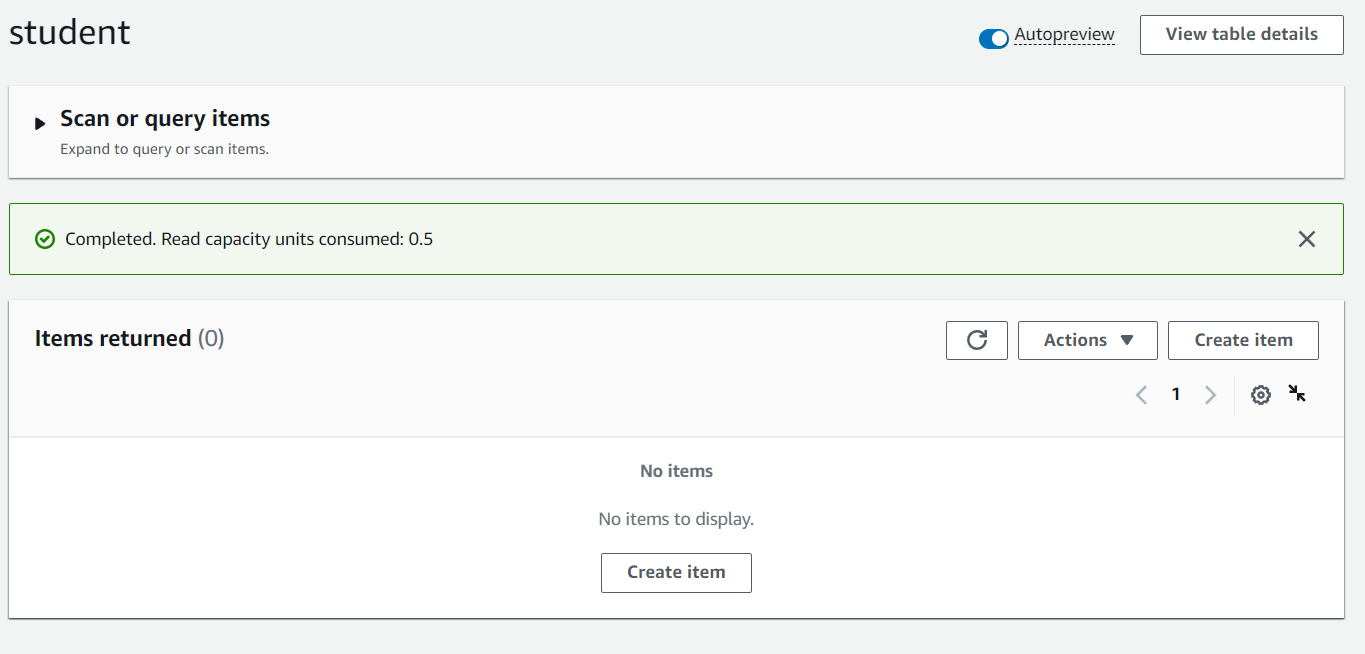
iv) When we try to delete the student
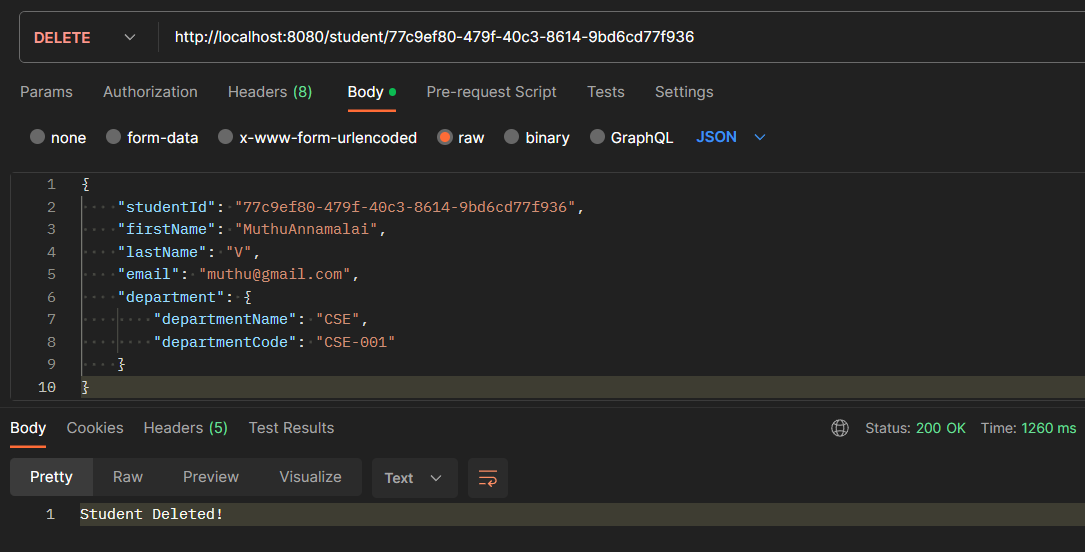
In DynamoDb, the data would be removed upon successful completion, as shown below
Conclusion
The purpose of this tutorial was to demonstrate how to connect to DynamoDB from a Spring Boot application. Following the steps discussed, we can create the configuration classes and connect to DynamoDB.